Friday, August 9, 2013

Toddler boy tie for $1.50!

It seems I have been on a bit of a hiatus.  I won't go in to too much detail but this is a time for celebrating, which is what got me back to "work" on making something.  Anyway, here is a tutorial on how to make a toddler boys tie.  It was super easy, super quick and super cheap!
Here is what you will need:
  • 4 inches of whatever type of fabric you want.  Most bolts are at least 43"inches long but if you get a fat quarter this is not the case.  You will need approximately 3.75" X 38" to make the tie.  Even then it will be a little long but he will be able to grow and still use it for a while :-)
  • an iron
  • a sewing machine, or not.  There is minimal machine sewing.  
Cut the fabric, in this case I used a fat quarter so I had to cut 2- 3.75" wide pieces and sew them together to get my 38" length.  Mens ties are sewn in a diagonal this way.  Iron the seam to one side.
 Iron a quarter inch seam allowance on both sides
Notice the pen marks on the above picture?  Well this was to tell me where to iron next.  I wanted the tie to be 1 and 1/4 inches wide in the middle at the seam all the way down to the skinny side and 2 inches wide on the thicker side.  Start to iron out the tie not worrying about the points on each end yet.
Here is the ironing so far.  The lower part is the front and thicker part of the tie.  The ironing should just meet and not overlap.  Then when you get to the middle of the tie it will start overlapping all the way down to the end and thinner part of the tie.  Can you tell that it is overlapping quite a bit now?  In a mens tie, it would not overlap but be cut perfectly to just meet, but this is for a toddler now! :-)

Now for the corners.  I just folded them inwards and let them overlap by a quarter inch.  After you iron the lines in, flip in inside out and prepare to sew.  You will need the ironing lines to know where the point of the tie is.

Align the tie and start from the seam allowance and sew down to the point of the tie.  This will hold the point of the tie in place.  Do this for both sides.
Just like so and flip back to the right side and re iron it flat.

Here is the tie flipped back to the right side.
After you have re-ironed all your folds, neatly hand sew along the where the tie meets and overlaps and you will end up with this!  The hand sewing took less then the time of the episode I watched while doing it.  Better still... the WHOLE thing was accomplished in a single nap time! 

There has nothing in store or online that you will find for as cheap or stylish, so give it a go!
I might have enough navy blue gingham fabric to do a bow tie too, so win win win!


Monday, May 20, 2013

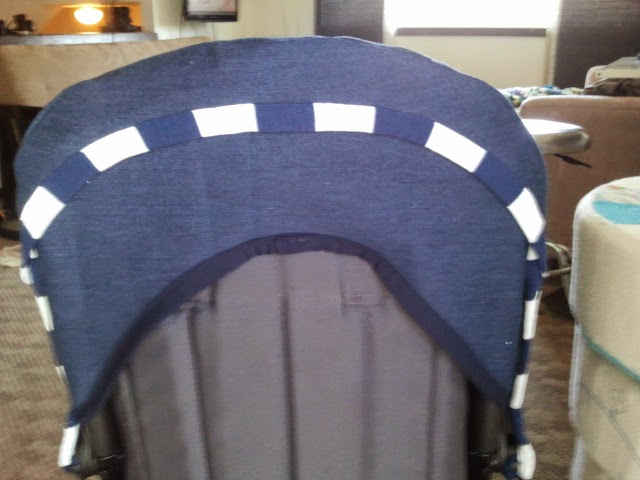
DIY Bugaboo Canopy and Seat liner for just over $2.00!!

After I made my first Bugaboo Cameleon Hood I decided I wanted to make another, along with a matching seat liner.  It seems like my son always manages to get snacks under the seat so I wanted to get something that would keep the snacks out, and be super cute. 

All fabrics used on this set are vintage that I purchased from a huge donation made to the thrift store I volunteer at.  Vintage denim and blue and white cotton make for this perfect "tshirt and jeans" Cameleon set. 

I need to do a bit more work on the 1 piece seat liner template in order to recreate a tailored fit.  My template didn't fit and I adjusted the liner without adjusting the template.  To make this, I combined the designs from the original Bugaboo seat fabric and footmuff.  What do you think? 

I have a great response out in public and I am really pleased with the result. 

The details
Demin - $0.99
Cottom - $0.99
Binding - Approx. $0.10
Total cost? Under $2.50 including tax and supplies!


Multi-use fabric box.

My latest sewing project was a fabric box.  I tried to document most of the construction for you so you can also attempt it yourself.  I've seen other tutorials online but decided to fashion my own because I knew I wanted to sew handles right into mine, instead of on to it.  Currently I am looking for creative ways to store my sons things, the first fabric box is for books, the next will be for those giant legos.  That one will have a lid so I will post that one when I am finished.

I got to planning....


My rough plan.  I have found that if you plan things out first and think a few steps ahead you will always have a neater finish.  It's definitely a good habit to have, I know as I have unfinished projects and projects I have had to re-work because I was too hasty.

1.  Cut 5 13''X13'' squares in 1 color for the outside, and the same in another color for the inside of the
box.  That's 10 squares total.
2.  Cut 5 12''X12" squares of interfacing.
  • 2A. If you are going to embellish the sides, do so now.  I created a book and a sign that says "Books" for my box.  I toyed with the idea of sewing on contrasting circles to create polka dots.  Be creative.  This is where you will add your personal touch. 

3. It would be helpful to iron on the interfacing before you start sewing the squares together. (Which I did not: Hasty)

4.  Sew both outer and inner layer of  squares into "t" shapes.


5.  Line up the "t's" and start on the handles.

6.  With right sides together, so up all the side of the "t" so that both the inside and the outside layers are sewn into boxes.  (See my drawing: A to B, C to D, E to F and G to H)


7.  Match up all the seams of both inner and outer layers and top stitch over them starting on the bottom.  Then top stitch from the bottom of the box, up to the opening of the box.  This will help the box hold it's shape and stand even without anything inside of it.


8.  Fold the top of the the box and top stitch all the way around. 


After writing out the instructions, I realized I do not have enough pictures.  Not to worry!  I plan to make another box so I will add in the photos accordingly. 
Thanks for looking! I hope you know that you can easily make a fabric box for whatever your uses, just as easy.  Be sure you comment with your fabric box. 


The details:
The inner blue fabric was from freecycle and left over from this project.
The brown fabric was from my old floor cushions, which I cut apart and used the above project.  Recycling the recycling!  The lighter fabrics were from a pants I cut apart and left over canvas from this project.  The interfacing was from the thrift store I volunteer at for $0.99 and I did not use all of it.  Total spent: approximately $0.75! 

Until next time!

Wednesday, May 15, 2013

Finished custom shirt for under $3.00!!

Here is the where what and why.

Where (did I get my supplies)? Thrift stores of course!  The fabric was vintage and donated to the thrift store I volunteer at along with ALOT of other fabric so I scored it at the huge fabric sale that they arranged.  The piece was 1 and a quarter yard for $1.99.  The buttons were from an assorted bag of buttons I picked up at another thrift store for $3.99.  I used much less then half so I'm going to say I used about $0.75 of the buttons.  The pattern I worked from was from a book I rented from the library so that was free.  The time/learning was priceless :-P

What (is it)?  The pattern was originally for a shift dress.  I took all my measurements and based on the books suggestions of my body type, the shift dress would be most flattering to my (very oddly shaped :-P) figure.  I got to work knowing I was going to alter it into a shirt.  There was also some extra alterations suggested to make the American Pastoral dress.  I just added and subtracted from there.

Why (did I make this)? Like my previous post and above paragraph states, my oddly shaped figure.  Okay okay, maybe it isn't so oddly shaped as ready to wear clothing is cut to 1standard to get it out as fast and cheap as possible.  MANY of us have issues with ready to wear,  and most clothing can be remedied with a few alterations.  I have already started altering some of my clothes but decided I wanted to do something from scratch.  This adds another "why?"  When I was volunteering at the thrift store, getting the fabric ready for the big sale, I got to speak with some of the other volunteers.  Most, okay all, were from another time.  A time when making your own clothes was cheaper then buying off the rack.   In high school, they made all their own clothes.  I envied them, they grew up in a time when sewing skills were not only taught, but necessary.  It really inspired me so I got to work on my sons hoodie right away and knew I wanted to start on clothing from scratch.

Here is my first attempt at a shirt from scratch tailored for my body.  It took several hours of adjusting, trying and retrying on, sewing and resewing.  The muslin I used to check my pattern was free from freecycle.


My estimated costs? Under $3.00 with tax!

In some other news, the weather is amazing and this is just the ultimate feel good tune.  Until next time... :-)

P.S Interested in new show about a sewing competition?
Check out The Great British Sewing Bee, the full season is currently up on youtube.

Tuesday, May 14, 2013

Quick update...shirt making!

Just a quick update here.  I have been working on and off and learning my way around making myself a shirt.  I have an annoying shirt size and no shirt ever fits right off the rack.
It's taking me a pretty long time because A) I never made a shirt before B) My health and motherhood have been completely exhausting and C) I deviated from a basic pattern that did not include how to do a collar, or cuffs.  I didn't really think about that at the time, but now it seems very odd.

Anyway here is my progress.
 Mock sleeve with tailored placket cuff.  My first try at attempting this.  I gave myself a grade of "B" because I understand how to do it, but I could have paid attention to the details.  I looked at a sewing book from the library, as well as a current shirt that I  own.  The book did not include specific details about measurements so I took the measurements from my shirt.


Peter pan collar.  Was a little off center but since I only pinned it, I was able to unpin it and get it centered better.  I am not loving the point at which it will be joined with buttons but, the pattern was too basic and did not include any information on attaching a proper collar.

Since there wasn't any information on the pattern I was stuck for a long time trying to figure out how to attach a collar, today it just came to me out of no where, after having no luck finding any good tutorials online.  Even though there was a basic pattern it seemed to only cover 40% of what I needed to do.  The other 60% was anticipating what needed to be done and learning it on my own.  At least I am learning though, right? :-)

The fabric was purchased from the thrift store I volunteer at for $1.99 so I hope to have a, thrifty priced, wearable shirt when it's done.  I will post the final product when I am finished!


Monday, April 29, 2013

Vintage fabric hoodie.

Check out the hoodie made for my 15 month old.  I scored some vintage late 70's/early 80's fabric from the thrift store that I volunteer at for $1 a yard.  The toggles came from a sweater I found at the same thrift store.  The brown fabric for the fastening loops came from my old floor cushions that I took apart (and re-did at that link) and the pleather triangles were cut out from a purse I found at the dig and save thrift store. I originally bought the purse to use the buckles for the straight jacket I made a while back.  More uses for stuff, yay!  Anyway, I saw a picture of a hoodie that someone made for a little girl and I loved the asymmetrical design of the front and decided I wanted to make some adjustments.  I changed the hood to make it into 3 panels so I could add more of the accent color and I used 2 toggles to close it, instead of 3 buttons.  I am super pleased with the result and everyone who saw it today commented on how he was dressed so cool.  :-D

Check it out!
Tracing out is sweater/ Cutting the pieces / Basting 

After the necessary adjustments of the hood and collar. 

The best part?  It only cost about $1 to make!  I drafted my own pattern tracing around a sweater he already owns and I used way less then a yard. OH! and the fabric I drafted the pattern onto was a large mens shirt that a friend gave to me to use for any possible sewing projects I have.  I hope you are convinced you can do something with left overs too! 

Vintage shirt of the day.  He wore it under the hoodie :-)


P.S If you have anything that you want to pass onto me for sewing, let me know!  If I can't use anything I donate it but I mostly keep everything, because I never know when it will come in handy.

Sunday, April 28, 2013

Antique first aid box upcycle to sewing cabinet

Here is a little something I did to get organized.  My sewing space is minuscule so it's tough keeping it neat yet functional.  Luckily I have a few things around the house that have helped with organizing.  A cigar box for one, and this antique first aid box.  Check it out.
Before

Before:  There was some cardboard glued to the inside that I already ripped out then I had to take off all the left over glue.  I left the outside in its original state and did a quick wipe down to the inside.

My husband found this guy at a garage sale this past summer for $2.00 and he loved it.  He wanted to come up with a purpose for it but it ended up just sitting up against a wall in our living area because it was just never decided on.  It wasn't until I was having a lot of difficulty locating bobbins and pins and anything else I needed that I had a light bulb moment looking at this old cabinet.  I immediately got to work.


The process

I picked up this screen printed sample at a local goodwill for $0.69 and am glad I was able to find a use for it.  The other beige fabric was from freecycle.

There was a bit of sewing involved, but I could have used iron on interfacing.  I was in a sewing mood I guess.  The screen printed fabric on the front and the beige fabric on the back.  I didn't want the glue I used to stick it onto the cabinet to come through so that is why I thought some backing was necessary.  Now I have a place to keep my spools of thread and notions so things are easier to find!  The best part?  This project was under $3!

The result