Today I write to you from a place of longing and wishful thinking. I long to be free to live in a way that is simple, yet fulfilling. To live off the land and solely on what comes from the combined skills and talents of my husband and myself. Since we were married, almost 6 years ago, it has been a dream of ours to be financially free to create and live stress/debt free and do things that were important to us, without having to compromise our lives working in a job that we didn't enjoy. Since then, I have tried to live this way on my own as my husband encourages me to to what I feel is necessary for my creative expression and happiness. However, the financial stress has not really made that possible. Yes I have the time to do the things I feel are important for me, but living with one income to pay for everything is something that is always in the back of my mind. Not only that, knowing my husband has to spend 40+ hours working jobs he does not enjoy and do not bring him fulfillment is not what I had in mind.
Now this is where I feel most people just give in, or more common, just don't see or think there is any other way around it. It's just accepted that you work, and toil your entire youth through middle age to pay for a certain standard of life with massive debts from your education, cars and homes. It isn't until retirement that you really get to do what you want to do. To me, this is all backwards and has never been the kind of life that I wanted to live. I remember talking to my husband on the phone one night, before we were married and telling him that I don't think that I could live in the current time and place that we live in. I hated all the pressure and expectations put on me by society to "know" what I want to do and spend the next 8 years of my life in school and the next 20 years after that of my life in debt. I told him that the only way I thought I could live is if I went off into the forest and lived the way humans lived over 10,000 years ago. I remember feeling desperate and that everything that happened in the last several thousand years had been a mistake. I laugh to myself right now, remembering this and I'm still thankful that my husband was in my life during that time to help me get some perspective on how I could live outside of that in the here and now.
Fast forward to now, and we arrive at the current tiny house movement. We don't want to live in a tiny house, because we are young and plan to have more children. The tiny house movement is great because it goes along with a lot of what we want to accomplish in a short amount of time. Unfortunately, I feel like that tiny house movement caters to those who have already lived the life that I don't want to live and have great credit and money already put away from their careers. I say this because, how else do you just drop everything, buy land and built a tiny house that ends up costing ten, twenty, or even thirty thousand dollars. It's great that people want to get out of living in our current system, but what about those of us who refused it from the start and don't have a hundred thousand dollars to show from it? Is my journey as liberating because I didn't "leave it all behind" to start a home stead. When I say "it all" I mean the three thousand square foot home and the career. What if you refused it from the get go, which meant that you live pay check to pay check because you didn't go into massive school loan debt. In the current system, no debt also means, no credit. Which to me is completely backwards. How does it make sense that the person who buys things they can't afford looks better then the one who lives within their means and saves for the things they need? So here we are.
It may take us longer, and it may be more radical, but we will get there. We have began serious talks to leave our $1000 a month apartment by the time a year lease is up. It might take a year of living in an RV or something of the like, cramped and mostly uncomfortable, but that's what I am willing to do to achieve our goal of having land and living sustainably. If giving up a year of relative comfort, allows us to be on a road to financial freedom then I am all for it! So welcome to the cusp of our homesteading journey.
Monday, September 15, 2014

Sunday, September 7, 2014
Pasta night!
My husband has been wanting a pasta maker since forever. I have been searching my local craigslist and even came across one at my local goodwill. I checked amazon and compared prices everywhere, but was never happy with the common $25 plus price listed. Sure I could have offered something I was more comfortable with to a craigslist seller, but I honestly don't really like doing that. I didn't want to offer my $12-15 range to someone and then deal with arranging a time in both our homes schedules that work and have to drive 15 minute to a half hour to get it. When you add up the stress of finding an arrangement and the gas it takes to get too and from, it just didn't seem like a pay off in my mind. So you can imagine my glee when I came across one at a local thrift store, and in my price range! My husband happened to be with me, which is not common while I'm thrifting, so I checked if he was interested and put it my basket.


Here it is set up and ready to roll (hehe) on our table. So shiny :-) The flat roller has different numbered settings so you can roll the pasta thinner and thinner by adjusting the number higher and higher. Then there is the attachment with the fettuccini and spaghetti cutters. Tonight we made fettuccini. So we got out our recipe book, which was also a thrift find, and got to work!
Usually the first time we try a new recipe or new food, my husband is always the first one to get on it. It awesome because if it goes bad the first time, hey! At least it wasn't me :-P There he goes starting the pasta dough. It's essentially the same deal as when you make pie dough, the consistency is the same so now I know he can make a pretty damn good pie crust by hand. I was telling him to through it in the mixer but the book was by hand. Anyway, he makes the dough and when it's ready we rolled it out because what we really wanted to do was use the pasta maker.
So I took a turn rolling out the pasta, flatter and flatter until it was time to put it in the fettuccini cutter. That's were the team work came it. It helps if one person rolls the pasta maker while feeding in the pasta and the other person catches the newly cut fresh pasta. We didn't have anything to hang the pasta so I has some hooks in my crafts supplies and some heavy duty thread. Attached them to the underside of the cabinets and viola! We had a place to hang our pasta to dry :-D
Since the pasta is fresh it didn't take as long to cook as regular pasta from the store takes. It's best to just hang near the stove and keep tasting until al dente.
We decided that we would also get some fresh mussels to go with our pasta. Se we did a simple pasta with butter, garlic, Parmesan, lemon, and parsley. We steamed the mussels and it was amazing all together. We had a fresh Italian, seafood meal for probably an 8th of what it would have cost in a restaurant! I also don't think I've ever had pasta that was 'made fresh in house daily' either :-P
This dish was was super easy and also has the added advantage of cooking with your love :-). I hope you will try it too. I know we will definitely make it again. What's more, we can make different variations with fresh ingredients and really explore with pasta. Also, ravioli! Don't even get me started on ravioli!
Until next time, stay thrifty! :-D
Wednesday, August 27, 2014
Jump suit obsession
I said I was going to update more but I lied again. This time, I have actually been extremely busy keeping up with my sewing though. So, sorry not sorry, as they say. I still don't have time to go to the computer to post this so hopfully this is successful from my phone. 

Things in Atascadero, ca have been great. I've met a few people and even started up a craft group, just like we had going in Madison, wi. I also started up my sewing and alterations business once again, to a surprisingly steady stream of clients. It's been awesome! I also started doing more clothing and alterations for myself. I am not making bags though, I'm just getting pulled into doing other things, but I plan to get to it. If only there were more hours in the day, right?
Anyway I am getting off topic! What I really came here to do was show off some jump suits that I made myself. Seriously, if I could wear a jumpsuit or maxi dress every I would.... But who am I kidding, I do. It just happens to be the same 4 items in rotation. Which I don't mind, per say, but I'm too restless. I need more change and variation in my life. However, jump suits can be $160+, and I'm not super into retail prices.
So I am sacrificing some of my fabric hoard and making jumpsuit! I cut enough out to make 5, getting ahead of myself, and realized some changes I would like to make after making 2. I'm going to try to get through with the 5 and make the changes if I have enough material to do but here are the first 2.
Forgive the tan on my feet :-P anyway, the first picture is what got me in a frenzy in the first place. Next to that is my first attempt. I like it, it has a utility kind of feeling to it which is interesting and it's loose enough that the lack of stretch doesn't effect the comfort at all. The next jump suit I made it slimmer, lenthend the sleeves and cropped the pant. There are also 2 small pleats on the front just to add a tiny detail to break up the monotony, I love monotony. Both are made from vintage fabrics I scored at a steal and have had forever, so I'm glad I got to use them!
Anyway, no spell check. It's back to the machines for me to finish up some cushions for a client. :-)
Until next time!
Wednesday, June 25, 2014
New sewing desk? Yes please!
Anyway I am completely addicted to craigslist so of course I browse and just see what I see. Luckily on Craigslist you can get lucky from time to time. We all heard those stories of a friend of a friend who scored something super awesome and authentic for a criminal price, right? Although I don't think my find is quite on those levels, I am pretty happy with it! So without further adieu, I would like to introduce you to my new sewing desk!  It is a Dixie Campaigner desk in pretty nice condition that I scored for $45! I made the area my own with my vintage first aid kit that I restyled into my thread storage. We scored that little gem a few years ago for only $2 :-D. Next to that I put one of our vintage crates up on the wall that I came across at a rummage sale for $5 and inside an antique weigh scale, that still works, that I got at a garage sale for $0.25. For now I am using a fold up chair that I found at a goodwill for $3.

I currently don't have any shelving for my fabric so I am using the desk for some of that. The big drawers at the bottom serve as fabric storage and the top 2 smaller drawers are for notions and such.

I had a much larger sewing space, with enough room to have all three machines out at once all in there own spots. Since we moved here though, my sewing area is right off our dining area and in complete view of the living room. So now, my machines and fabrics must stay in the closet and out of view. Eventually I want to make that into a nice organized and efficient space. I have only completed 1 sewing project so far and here it is.

Curtains for my sons room. The number letter fabric was a goodwill find at only $5. It was just shy of the length that it needed to be so I added the detail at the top with extra fabric I already had.
Anyway I look forward to sharing more with you soon. :-)
Tuesday, June 24, 2014
CALIFORNIA!
Wow, that was another hiatus... What's new.. Well A LOT since I last posted. We moved into a house with another family and shared for a year. That had its pros and its cons, but ultimately I am grateful for the experience. I spent a lot of time that year focussing on sewing and crafting. I even established a weekly craft group and it was great fun. I really miss it! We ended up moving to California as a job fell into my husbands lap, which was amazing. I am so happy for him being able to do something that he loves and acquire skills he wants to be a custom wood worker. He's already made me a few items, which I am extremely happy. I sew him something, he crafts me something... it's wonderful :-D
Anyway, we are pretty much settled here in Atascadero and I look forward to keeping up to date with thrift finds, projects and tutorials again. Please let me know if there is anything you want to see!
Anyway, we are pretty much settled here in Atascadero and I look forward to keeping up to date with thrift finds, projects and tutorials again. Please let me know if there is anything you want to see!
Friday, August 9, 2013
Toddler boy tie for $1.50!
It seems I have been on a bit of a hiatus. I won't go in to too much detail but this is a time for celebrating, which is what got me back to "work" on making something. Anyway, here is a tutorial on how to make a toddler boys tie. It was super easy, super quick and super cheap!


Here is what you will need:
- 4 inches of whatever type of fabric you want. Most bolts are at least 43"inches long but if you get a fat quarter this is not the case. You will need approximately 3.75" X 38" to make the tie. Even then it will be a little long but he will be able to grow and still use it for a while :-)
- an iron
- a sewing machine, or not. There is minimal machine sewing.

Iron a quarter inch seam allowance on both sides

Notice the pen marks on the above picture? Well this was to tell me where to iron next. I wanted the tie to be 1 and 1/4 inches wide in the middle at the seam all the way down to the skinny side and 2 inches wide on the thicker side. Start to iron out the tie not worrying about the points on each end yet.

Here is the ironing so far. The lower part is the front and thicker part of the tie. The ironing should just meet and not overlap. Then when you get to the middle of the tie it will start overlapping all the way down to the end and thinner part of the tie. Can you tell that it is overlapping quite a bit now? In a mens tie, it would not overlap but be cut perfectly to just meet, but this is for a toddler now! :-)

Now for the corners. I just folded them inwards and let them overlap by a quarter inch. After you iron the lines in, flip in inside out and prepare to sew. You will need the ironing lines to know where the point of the tie is.


Align the tie and start from the seam allowance and sew down to the point of the tie. This will hold the point of the tie in place. Do this for both sides.

Just like so and flip back to the right side and re iron it flat.

Here is the tie flipped back to the right side.

After you have re-ironed all your folds, neatly hand sew along the where the tie meets and overlaps and you will end up with this! The hand sewing took less then the time of the episode I watched while doing it. Better still... the WHOLE thing was accomplished in a single nap time!
There has nothing in store or online that you will find for as cheap or stylish, so give it a go!
I might have enough navy blue gingham fabric to do a bow tie too, so win win win!
Monday, May 20, 2013
DIY Bugaboo Canopy and Seat liner for just over $2.00!!
After I made my first Bugaboo Cameleon Hood I decided I wanted to make another, along with a matching seat liner. It seems like my son always manages to get snacks under the seat so I wanted to get something that would keep the snacks out, and be super cute.
All fabrics used on this set are vintage that I purchased from a huge donation made to the thrift store I volunteer at. Vintage denim and blue and white cotton make for this perfect "tshirt and jeans" Cameleon set.
I need to do a bit more work on the 1 piece seat liner template in order to recreate a tailored fit. My template didn't fit and I adjusted the liner without adjusting the template. To make this, I combined the designs from the original Bugaboo seat fabric and footmuff. What do you think?
I have a great response out in public and I am really pleased with the result.
The details
Demin - $0.99
Cottom - $0.99
Binding - Approx. $0.10
Total cost? Under $2.50 including tax and supplies!


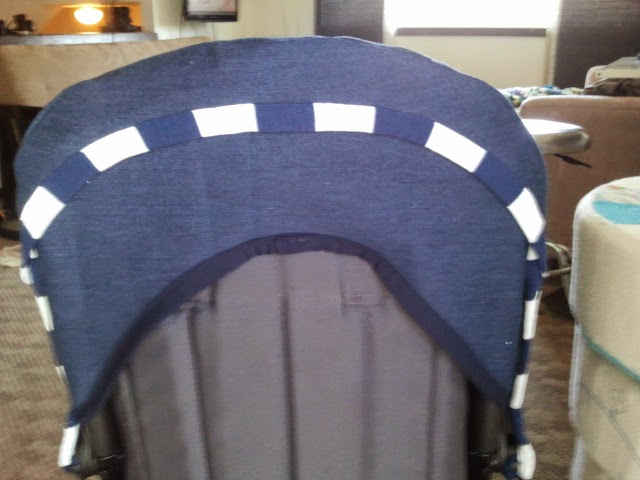
All fabrics used on this set are vintage that I purchased from a huge donation made to the thrift store I volunteer at. Vintage denim and blue and white cotton make for this perfect "tshirt and jeans" Cameleon set.
I need to do a bit more work on the 1 piece seat liner template in order to recreate a tailored fit. My template didn't fit and I adjusted the liner without adjusting the template. To make this, I combined the designs from the original Bugaboo seat fabric and footmuff. What do you think?
I have a great response out in public and I am really pleased with the result.
The details
Demin - $0.99
Cottom - $0.99
Binding - Approx. $0.10
Total cost? Under $2.50 including tax and supplies!
Subscribe to:
Posts (Atom)